

A

You are using an out of date browser. It may not display this or other websites correctly.
You should upgrade or use an alternative browser.
You should upgrade or use an alternative browser.
A
Anonymous
Guest
For simplicity's sake, I will use the following terms in regard to the Eclipse 6 top canopy: "Hood" refers to the removable top portion that comes with the little NO flourescent light attached to it. "Top brace" refers to the ring that holds the tank together, and "bottom brace" refers to the second brace, that I bought from www.marineland.com
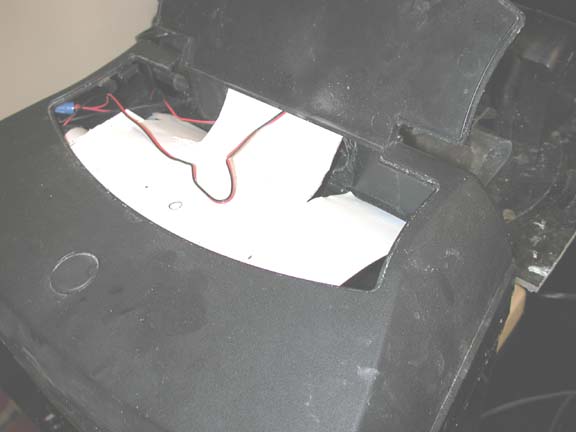
The LOA has to be completely torn apart. Save the reflector, the white socket part, and all the wiring. I used some extra wire to remove the electronic circuitry from the canopy and place it in an isolated external box. This is all just simple wiring and shouldn't require any extra explanation. I cut two lines in the reflector and bent it a bit to allow the fans to cool the bulb. The plastic of the socket needs to be trimmed a bit in order to fit in the canopy.
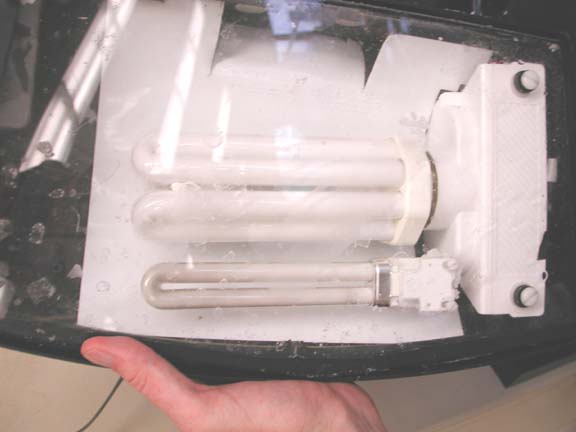
I cut out the middle bar of the top brace to allow room for the bulbs. A piece of 1/4" acrylic, cut to the approximate shape of the brace, is glued to the bottom of the top brace, and silicone is applied on the top side ("light" side) between the acrylic and brace to keep out water and salt. Small holes were already drilled in the piece of acrylic, and nylon screws and wingnuts are used to anchor the LOA socket. The socket is raised off the acrylic a bit with some rubber grommets to keep the light from touching the acrylic. The holes in the LOA socket are already there. You can see there is a 13W bulb as well, and there is room for another one if desired on the other side of the big bulb. The hood has all its original components removed, of course, and there are two small fan holes drilled into the back of it. The only problem with this setup is that the brace can no longer hold the tank together! The acrylic prevents the brace from sliding onto the edge of the tank, and there is no middle bar even if it could. It will bow out and, presumably, eventually crack.
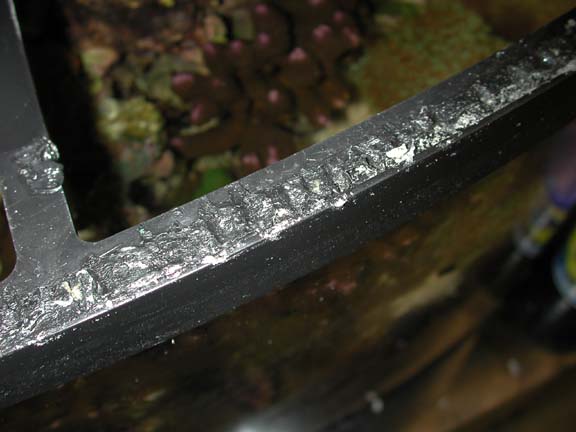
This is why I had to buy a second brace, and modify it in the following way. I simply used a soldering gun to melt away all the raised plastic that prevents the flat acrylic from sitting on it. This bottom brace holds the tank together, and the top brace sits on top of it and holds the light. Here is a picture of the melted bottom brace.
The LOA has to be completely torn apart. Save the reflector, the white socket part, and all the wiring. I used some extra wire to remove the electronic circuitry from the canopy and place it in an isolated external box. This is all just simple wiring and shouldn't require any extra explanation. I cut two lines in the reflector and bent it a bit to allow the fans to cool the bulb. The plastic of the socket needs to be trimmed a bit in order to fit in the canopy.
I cut out the middle bar of the top brace to allow room for the bulbs. A piece of 1/4" acrylic, cut to the approximate shape of the brace, is glued to the bottom of the top brace, and silicone is applied on the top side ("light" side) between the acrylic and brace to keep out water and salt. Small holes were already drilled in the piece of acrylic, and nylon screws and wingnuts are used to anchor the LOA socket. The socket is raised off the acrylic a bit with some rubber grommets to keep the light from touching the acrylic. The holes in the LOA socket are already there. You can see there is a 13W bulb as well, and there is room for another one if desired on the other side of the big bulb. The hood has all its original components removed, of course, and there are two small fan holes drilled into the back of it. The only problem with this setup is that the brace can no longer hold the tank together! The acrylic prevents the brace from sliding onto the edge of the tank, and there is no middle bar even if it could. It will bow out and, presumably, eventually crack.
This is why I had to buy a second brace, and modify it in the following way. I simply used a soldering gun to melt away all the raised plastic that prevents the flat acrylic from sitting on it. This bottom brace holds the tank together, and the top brace sits on top of it and holds the light. Here is a picture of the melted bottom brace.
Attachments
A
Anonymous
Guest

Yup, it was necessary on the top brace to allow enough vertical space for the bulb. I would have liked to cut it out on the second brace as well but I needed it for structural support. If you get the hood and bulb/socket together, you can probably figure out something similar. This is by no means "the way to go", but it certainly works for me.
BTW, if you want even more light, a 96W Powerquad pendant wil sit on top of the tank brace quite nicely and just replaces the hood. This is what I wanted to do in the first place, but my livestock needed a sealed top.
BTW, if you want even more light, a 96W Powerquad pendant wil sit on top of the tank brace quite nicely and just replaces the hood. This is what I wanted to do in the first place, but my livestock needed a sealed top.
Sponsor Reefs
We're a FREE website, and we exist because of hobbyists like YOU who help us run this community.
Click here to sponsor $10:
